Thursday, June 29, 2017

Kaisercraft Sage and Grace Publication and Cards with Instructions

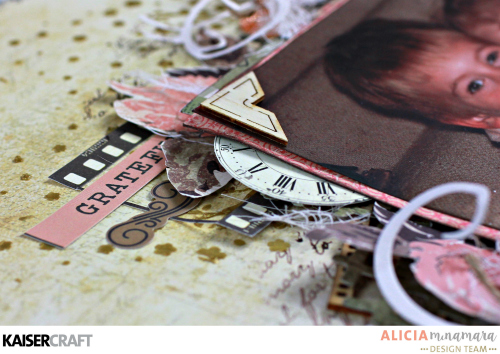
Kaisercraft Sage and Grace Publication by Alicia McNamara

Hello Crafty Friends,

I'm playing catch-up today and blogging my last layout and Publication for Sage and Grace.  A lovely photo of my brother and his wife on their wedding day.

Full details on how to create this layout can be found on the Kaisercraft Webpage here.

Kaisercraft Sage and Grace Publication by Alicia McNamara

Materials used: 

PAPERS: Sage & Grace Collection - P2312 Render, P2309 Dainty, P2307 Blush, P2311 Pink Peony. KC PRODUCTS: CT881 Collectables, PP1019 Paper Pad, SS338 Sticker Sheet, Flourish Packs - FL600 Garden, FL586 Frames & FL590 Love, Pearls – SB786 Rose, 6x6 Designer Template – IT444 Scratchy, Decorative Die – DD757 Large Flourishes, Clear Stamp - CS257 Background Script, Ink Pad – IP719 Black, Paper Blooms – F641 Dusty Pink, Mini Paper Blooms – F657 Fairy Floss, Kaisercolour Paint - KC013 Dusty Pink, CL104 Gel Pen Box - 48 Colours. OTHER: Cheesecloth, Organza Ribbon. 

Instructions:

Trim RENDER to 11 ½ inches x 11 ½ inches and ink the edges with Black Ink. Place Scratchy Template on top of RENDER and paint with Dusty Pink Paint and ink with Black Ink Pad. Stamp Background Script onto RENDER in a diagonal line from corner to corner. Layer photo onto paper from Paper Pad with mounting tape and position in the centre of the page. Fussy cut flowers from BLUSH paper. Cut Large Flourishes from PINK PEONY paper. Layer fussy cut flowers, large flourishes, Collectables and Wooden Flourishes in a diagonal fashion from corners of photo to corners of page. Embellish with Dusty Pink Paper Blooms, Cheese Cloth and butterflies from Collectables and Sticker Sheet. Add Rose Pearls in clusters of three. Attach “Great Moment” Title Sticker in bottom Left-hand corner.  

Kaisercraft Sage and Grace Publication by Alicia McNamara

These were a couple of super quick and easy cards I made using the Sage and Grace Collection too.

Kaisercraft Sage and Grace Card by Alicia McNamara

Materials used: 

PP1019 Paper Pad, CT881 Collectables, F657 Mini Paper Blooms – Fairy Floss, FL590 Wooden Flourishes – Love, IP725 Ink Pad – Petal Pink, CD101 Card Stock – Coconut, DD755 Decorative Die – Lace Borders.  Other: Kindy Glitz

Instructions:


Cut Coconut Card Stock to 4 ½ inches x 12 inches and fold in half to make base card.  Cut striped paper from Paper Pad to 4 ½ x 6 inches and layer onto front of card.  Cut two Lace Border Dies from white paper in the Paper Pad.  Layer these under a 2 ¼ x 6 inch green strip and adhere to base card.  Choose four hearts from Collectables and position with mounting tape onto centre of green strip.  Ink two wooden flourishes with Petal Pink ink and glue to three of the hearts.  Cover wooden flourishes with Kindy Glitz.  Glue one small paper bloom to fourth heart.


Kaisercraft Sage and Grace Card by Alicia McNamara

Materials used: 

PP1019 Paper Pad, SS338 Sticker Sheet, BRB606 Organza Ribbon, CD101 Card Stock – Coconut,

Instructions:

Cut Coconut Card Stock to 5 inches x 10 ½ inches and fold in half to make base card.  Cut polk-a-dot paper from Paper Pad to 3 ½ x 5 inches and layer onto front, top section of card.  Cut pink paper from paper pad to 2 x 5 inches and layer onto bottom section of card.  Take two lace stickers from Sticker Sheet and layer over the join between the two papers. Cut ¼ x 5 inch strip of white paper from the paper pad and layer over the join between the two lace stickers.  Tie organza ribbon over the top of the white strip.  Cut sentiment from Paper pad and adhere to right-hand side of Organza bow with mounting tape.


Have you liked my Facebook Page?  Time to Create has a little page on Facebook which keeps you updated on my latest blog posts and giveaways! Check it out here.

I send a newsletter out once a month and have a bi-monthly Giveaway.  If you would like to subscribe please do so below : ) Come and join our friendly crafting group!


Subscribe to our mailing list

* indicates required


Thanks for stopping by today,

Twitter Facebook Youtube Pinterest Instagram Google+ Bloglovin' Image Map

Monday, June 26, 2017

10 ways to add Texture to a Layout

10 Ways to Add Texture to a Layout - By Alicia McNamara

Do you love to add a variety of textures to your Layouts?
I know I do.
 Today I'm listing ten different ways we can make our layouts full of a variety of rich texture.
  Plus I am sharing a Layout I made recently with Kaisercraft's Keepsake Collection.
1 - Layers of Paper
 
Probably one of the most obvious ways we can add texture to Layouts is layering papers on top of each other and this is particular effective when separating the layers with Mounting Tape to add extra height.
2 - Stamping

Background stamping is a quick and effective way of adding texture to a Layout.  In this Layout I used my all-time favourite Background Script stamp by Kaisercraft.  I adore this stamp and it goes with nearly every paper collection.


Kaisercraft Keepsake Layout by Alicia McNamara
3. Paper Blooms
Paper Blooms are perfect for adding lots of texture to a Layout.  In this Layout I am using one of my favourite colours of Kaisercraft Paper Blooms; Dusty Pink.
4. Templates 
Templates are perfect for adding texture to the backgound of a Layout.  In this Layout I mixed Gold Paint with Impasto and spread the paste carefully over the template to create a floral background effect.
Kaisercraft Keepsake Layout by Alicia McNamara
5. Twine or Ribbon
Twine or Ribbon can be tied into bows and added to clusters of flowers.  
In this layout I have used Kaisercraft's Natural Twine.
6. Wooden Flourishes
Wooden Flourishes are awesome for adding a variety of texture which is very different from other embellishments on the page.  In this layout I've used Photo corners on the photograph and film strips in the clusters.
Kaisercraft Keepsake Layout by Alicia McNamara
7. Cheesecloth
Cheesecloth is perfect for softening a cluster.  Cheesecloth just adds that little bit of wispy fabric feel to a cluster of embellishments.
8. Die Cuts
Die Cuts are perfect for adding swirls to your layout.  
Fine paper swirls were cut in white for this Layout.
Kaisercraft Keepsake Layout by Alicia McNamara

9. Acetate
A Film Strip cut from an Acetate sheet was used in this Layout to add more texture.
10. Sparklets 

Sparklets, Rhinestones, Pearls or Sequins can be used to add some sparkle and texture to your page.


Kaisercraft Keepsake Layout by Alicia McNamara
I can already think of a few more ways of adding texture into a Layout.  This list is certainly not exhaustive...do you have a tip or two you could share?
 Please add your thoughts in the comments below.
Have you signed up to my newsletter? I have a bi-monthly giveaway,  Sign up below to be in with a chance to win!

Subscribe to our mailing list

* indicates required

Kaisercraft Products: P2325 Captured | P2326 Gallery | P2330 Photomontage | P2329 Collected | PS493 Photo Frames | SS340 Sticker Sheet | CT883 Collectables | FL602 Snapshot | IP724 Bark Ink Pad | IT001 Template - Cherry Blossom | KC050 Metallic Gold Paint | F641 Paper Blooms - Dusty Pink | CS257 Background Stamp - Script | DD757 Decorative Die - Large Flourishes | RS412 Sparklets - Saffron | LDB1059 Natural Twine | Other: Cheese Cloth | Impasto |
Twitter Facebook Youtube Pinterest Instagram Google+ Bloglovin' Image Map

Friday, June 23, 2017

How to Create a Multi-Layered Card

Kaisercraft Keepsake Card with Video Tutorial by Alicia McNamara

Hello Crafty Friends,

When I saw the new and beautiful Keepsake Collection I thought it would be perfect for making a heavily embellished card.  I decided to film a Process Video to match because I often get questions about how to begin a card that has lots of layers and embellishments, what colours and papers can be chosen to put together and what elements can be used.  Today I will show you exactly how I made this one from start to finish.


To make the card I began with some folded craft card stock measuring 23 x 17cm.  I cut some Photomontage (16.5 x 11cm) to fit the front of the card and a strip of Photomontage (reverse) measuring 5.5 x 16.5 cm.  I inked everything with Bark ink.  I layered the strip onto the card with mounting tape for extra dimension and this was the base of my card.  I chose the Photomontage Paper because I liked the shade of green and I liked the small white floral clusters.

Kaisercraft Keepsake Card with Video Tutorial by Alicia McNamara

I stamped onto the Photo Frames Acetate 12x12 sheet for the sentiment of my card, because I love the novelty of this Acetate sheet and I wanted to play with it again.  I used Stazon Ink to stamp onto the Acetate and it dried clearly without smudging.   I backed this sentiment with Captured paper, I chose this because I felt it was a slightly different colour to the other papers on the card, but still coordinated.  The thing with the Kaisercraft collections is that the colours are so well chosen you really can't go wrong with your paper choice.  Everything matches really nicely so you can be confident with your paper choice.  I added sticker strips for extra details and chose a lovely flower cluster sticker for my main embellishment.  I wanted something large and floral.  This sticker was perfect.

Kaisercraft Keepsake Card with Video Tutorial by Alicia McNamara


I used my one of my most favourite Kaisercraft Decorative Dies ever DD757 Large Flourishes .  If you haven't purchased this Decorative Die yet you need to! It goes so well with Paper Blooms and most Kaisercraft Paper Collections.  I find it adds a little dimension and another layer to a Multi-Layered card.  I actually like to cut this die in half and pop it under some Paper Blooms.  The colour of the flowers I chose was Dusty Pink, another favourite of mine.  They co-ordinate nicely with lots of the Kaisercraft Paper Collections as well, so a very good colour to have in your craft supplies.


I chose some lovely Collectables to add to my card (leaves and butterflies are always good!) and layered everything together.  You see how I repositioned all the elements on the card until I was happy with it in the Process Video.

Kaisercraft Keepsake Card with Video Tutorial by Alicia McNamara

I love adding the little wooden shapes from the Kaisercraft Flourish Packs.  For this card I chose two photo frame corners from the Snapshot Pack.  Thes add another dimension to the card that is different from paper.  You can ink or colour these wooden flourishes, but for this card I chose to leave them in their original state.


Finally I embellished with some Chocolate Pearls.  This finishes the card off and again gives another texture to the card.  They can be added in groups of three or two, or whatever grouping you prefer.

Kaisercraft Keepsake Card with Video Tutorial by Alicia McNamara

Kaisercraft Products:
P2325 Captured | P2330 Montage | PS493 Photo Frames Acetate | SS340 Sticker Sheet | CS302 Clear Stamps | CT883 Collectables | FL602 Flourish Pack - Snapshot | DD757 Decorative Die - Large Flourishes | F641 Paper Blooms - Dusty Pink | CD651 Kraft Card Stock | SB792Pearls - Chocolate | Other: Cheese Cloth

Kaisercraft Keepsake Card with Video Tutorial by Alicia McNamara

I had a lovely time designing this card using the beautiful Keepsake Collection.  I'm sure you will love this collection too.  I hope you have found a little inspiration from my video.  If you have any more questions feel free to leave me a comment and I can reply. Have a crafty weekend : )


Maybe you might like to subscribe to my mailing list? I'd love to have you as part of my inner crafty circle : )

* indicates required

Twitter Facebook Youtube Pinterest Instagram Google+ Bloglovin' Image Map

Thursday, June 22, 2017

Kaisercraft Daydreamer Set of Ten Cards with Process Video

Kaisercraft Daydreamer Set of Ten Cards by Alicia McNamara

Hello Crafty Friends,

Today I am sharing a set of cards I made using the new Kaisercraft Daydreamer Collection.
I was inspired by the stamp set that goes with this collection.  I really wanted to have a play with it and my new stamping tool sent to me by my very kind friend Collette.  

I filmed a Process Video while I made these cards if you would like to see it.

Here are some quick photos of each of the ten cards.

Kaisercraft Daydreamer Set of Ten Cards by Alicia McNamara

Kaisercraft Daydreamer Set of Ten Cards by Alicia McNamara

Kaisercraft Daydreamer Set of Ten Cards by Alicia McNamara

Kaisercraft Daydreamer Set of Ten Cards by Alicia McNamara

Kaisercraft Daydreamer Set of Ten Cards by Alicia McNamara

Kaisercraft Daydreamer Set of Ten Cards by Alicia McNamara

Kaisercraft Daydreamer Set of Ten Cards by Alicia McNamara

Kaisercraft Daydreamer Set of Ten Cards by Alicia McNamara

Kaisercraft Daydreamer Set of Ten Cards by Alicia McNamara

Kaisercraft Daydreamer Set of Ten Cards by Alicia McNamara


Kaisercraft Products: SS341 Sticker Sheet | PP1022 Paper Pad | CS303 Clear Stamps | CT844 Collectables  P2342 Stargaze | FL603 Dream Flourish Pack | IP792 Island Ink Pad | IP725 Petal Pink Ink Pad | IP719 Black Ink Pad | CD511 White C6 Card Pack | EF267 Moon and Stars Embossing Folder | RS409 Sparklets - Ebony | Rs415 Sparklets - Princess | CL104 Gel Pens - 48 Pk | 

I had a lot of fun making this set of cards.
Thanks for stopping by : )

Twitter Facebook Youtube Pinterest Instagram Google+ Bloglovin' Image Map