Showing posts with label DIY Projects. Show all posts

Tuesday, September 15, 2015

DIY Christmas Home Decor - Slot Tree

By Alicia McNamara

Today over at the Kaisercraft Blog the Design Team are showcasing some Christmas Decor using the "Home for Christmas" collection.  I chose to decorate a slot tree.
I can just imagine three of these along the middle of the table on Christmas Day and they are very quick and easy to make.

Method:

1. Paint the edges of your tree.
2. Use the wooden panels to trace the pattern onto the paper and cut out.
Slot your tree together.
3. Use glue or mod podge to adhere the paper panels to the tree.
4. Decorate the tree with pearls, snowflakes dies, heart dies and a sticker.
5. Glue a doily to the bottom of the tree.
6.  Add some leaves and paper blooms.
7. Glue a star to the top of the tree.

These little trees would make lovely gifts for family and friends as well.
The decorating possibilities are really endless.

By Alicia McNamara

You might like to consider this little snowflake die as an addition to your crafting collection, if you don't already have one.  It is so versatile! I have used it in nearly every single one of my christmas creations this month.  The paper pops out really easy and can be made in any colour paper to go with the papers you are using.  It really adds a bit of Christmas glam to any project.  Its a very easy, space-filling embellishment.

By Alicia McNamara

I popped a little Paper Doily underneath with some paper blooms and leaves from the Collectable pack.  The Love, Peace, Joy is a sticker.  I really enjoy using these stickers.  They are excellent quality and sit so nicely on any creation.

Kaisercraft Products I Used: 
SB2380 Slot Tree

P1936 Sugar Plum

P1937 Pinecones


P1938 Eggnog


P1940 Decoration


CT838 Collectables

DD318 Card Creations Snowflake Card Flip


EM405 Paper Doily


DD728 Decorative Die Christmas Trees


ST921 Seasons Greetings


F664 Paper Blooms – Fire Red


F653 Mini Paper Blooms – Ruby

SB789 Chino
KC002 Antique White

Stay tuned for more Christmas Creations and Family Tree Layouts coming up on my blog this week and next week : )  I have been busy doing lots of research on my Family Tree lately and learning a lot! 
Thanks for stopping by : )
Twitter Facebook Youtube Pinterest Instagram Google+ Bloglovin' Image Map

Thursday, April 23, 2015

My Re-Covered Lounge - DIY Special for under $200

DIY Lounge Project

A few weeks ago I decided to cover our "Green Crocodile Lounge".  This was a lounge we bought second hand off Gumtree...and it has a bit of a story attached to it.  I won't go into all the details but we bought it urgently as we needed a place for my Mum to sleep when she was coming to visit.  It has a fold-out bed inside so perfect for guests.

DIY Lounge Project

Unfortunately we kind of hated it from the moment we bought it and felt like we got a bit ripped off by the person who sold it to us, so we were tolerating the colour (and had been for nearly 2 years). But on the other hand it was really comfortable to sit on and we found ourselves sitting on "the green lounge" all of the time instead of our leather recliners which we had paid a fortune for previously. 

 I'm not really a green person...well at least I don't really like this shade of green.  We tried to minimise some of the green with the soft grey throw over the back of the lounge.  There was just something about this lounge which felt like it didn't suit us.

I knew in my head that I would like to recover it.  I measured it all up and thought it would take approximately 10 metres of fabric.  Then I priced fabric at Spotlight and realised it would at least cost me $150 to buy the material.  So I shelved the idea for about one year.

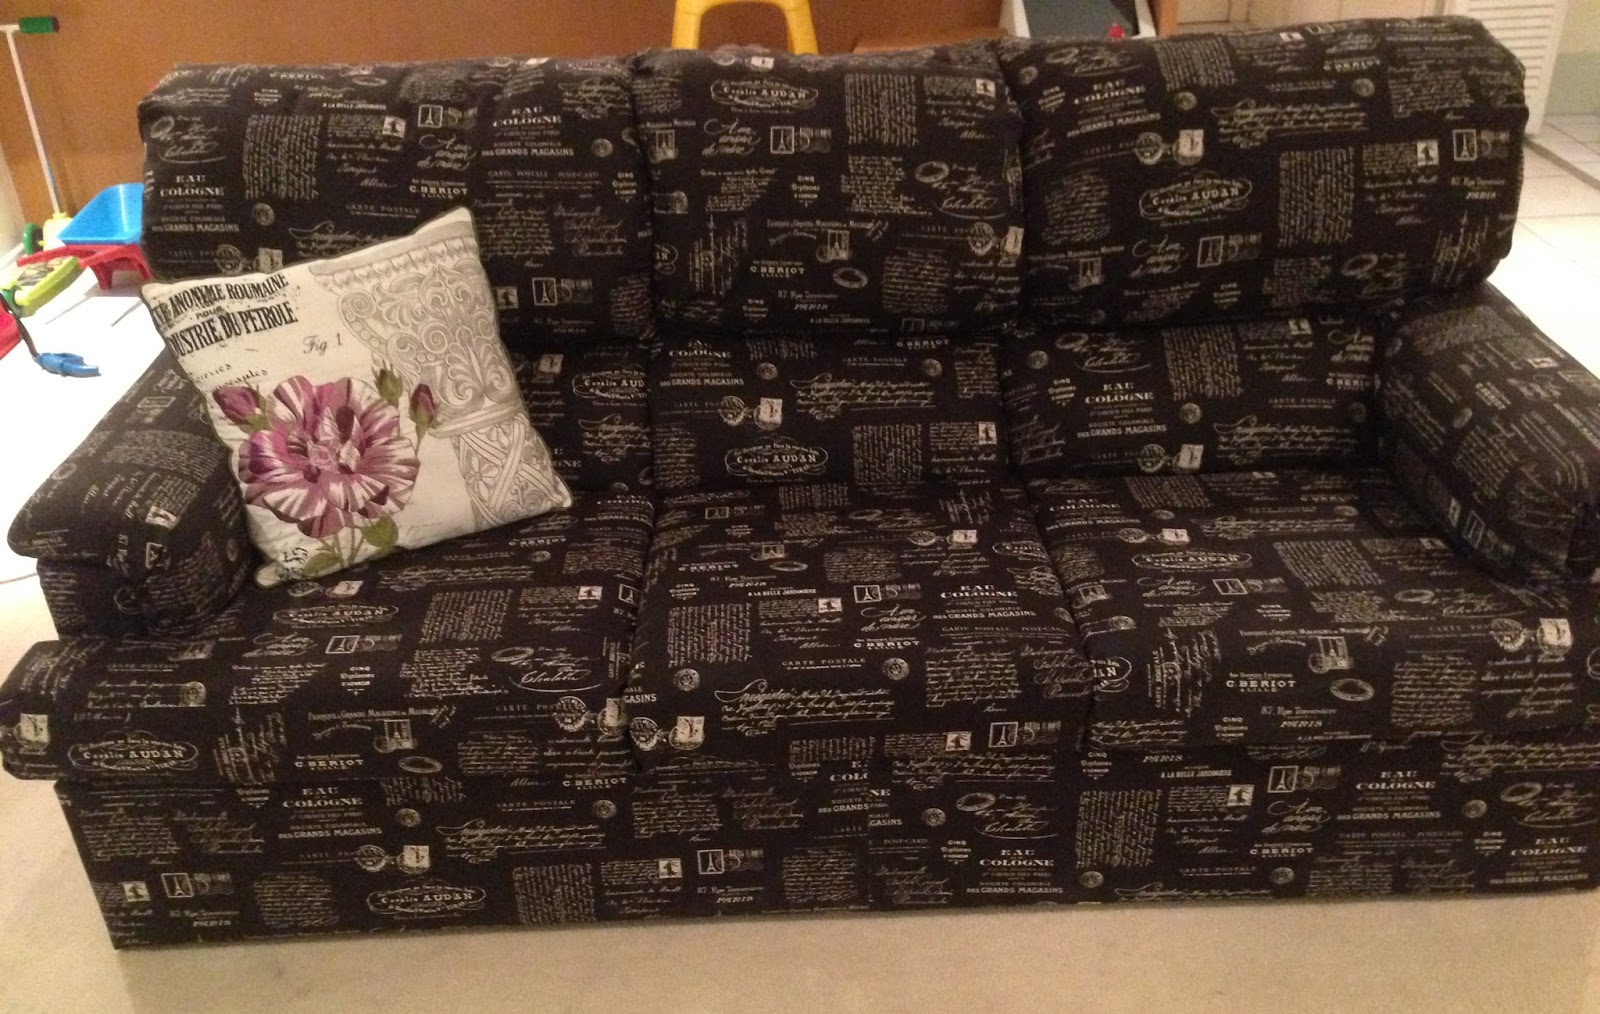
Last month I received a Spotlight catalogue in the mail and I had already planned to go to Spotlight the next day.  As I was flipping through the catalogue I saw this fabric at 40% off the marked price and I felt that the colour and style would suit our home.  I wanted a dark fabric that would hide everything because we often sit on this lounge and eat food and watch TV so it does need to handle food and drink spills.  I also felt the colour would go with some woven baskets in our cube bookshelf which is next to the lounge, but not pictured in any of the photos.

So the next day I bought ten metres of this fabric on a whim for $150 and a staple gun from Bunnings for $17 and nervously set to work.  I have never covered any type of furniture before so I was pretty anxious about hopefully doing a good job and not a) wrecking the lounge and b) wasting my money and time.

DIY Lounge Project

To begin with I stapled the material around the wooden base of the lounge.  Which was the easiest bit of all.  Then I worked on the arms of the lounge.  At this point I decided a hot glue gun would be very helpful and fast.  I went and purchased one and some glue sticks to go in the gun for about $15.

Then I completed the back cushions and lastly the front cushions.  I actually thought I had bought way too much fabric at the beginning.  But by the time I got to the end I really only just had enough.  I have a few scraps left over which I plan to make into cushions for the leather recliners to hopefully tie the colour even more into the rest of the room.

DIY Lounge Project

My recovering job is by no means perfect! But you cant really see any of the imperfect bits and it actually came up really well.  I am very happy with the end result.  I am still yet to source some cushions that might compliment the lounge more.  This one pictured below is one we already had at home.  It is doing the job for the time being until I see something nice and affordable.  All of our cushions tend to end up on the floor anyway and I am constantly picking them up.

DIY Lounge Project

Total cost of the project was under $200 and it took me about three weeks to complete it.  I did it mainly when Nicky was asleep or happy playing.  I didn't do it every day.  If you had un-interrupted time I would say 2-3 days should easily have it all finished.

The material I picked is not as good a quality as the original green and has started to get a faded look about it slightly.  But it kind of gives it a chalk-board look which suits me because I like the chalkboard effect.  I can't say how long I think it will look amazing for.  But I think it will be a good kids lounge in a playroom or fold-out bed in a spare room for guests for many years to come.  In the meantime we are using it every day in our main living area until we move into a bigger house or win some money and decide to buy new furniture lol!

Have you ever recovered any furniture?
I would love to hear your story. 

Twitter Facebook Youtube Pinterest Instagram Google+ Bloglovin' Image Map